

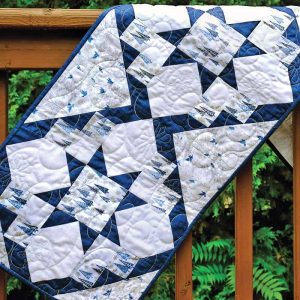
This table runner is generous in size and will work well in directional or non-directional fabrics. The runner is perfect for buffet-style family gatherings and entertaining. Enjoy decorating your home with quilted treasures. Finished size: 16″ x 48″
Fabric Requirements
Note: suitable for directional or non-directional fabrics in the setting corners; see instructions for directional cutting.
- Background fabric: 0.35 metre (⅓ yard)
- Accent fabric: 0.5 metre (½ yard)
- Focus fabric: 0.35 metre (⅓ yard)
- Setting triangle fabric: 0.35 metre (⅓ yard)
- Binding: 0.35 metre (⅓ yard)
- Backing: 1.4 metres (1½ yards)
- Batting: at least 46 cm x 127 cm (18″ x 50″)
Cutting Directions
Note: There are bias cuts in this pattern. Fabrics will be much more stable with starch to prevent stretching and distortion. It is highly recommended to spray and iron fabric with quilting-quality spray starch before you cut!
Directional Fabric
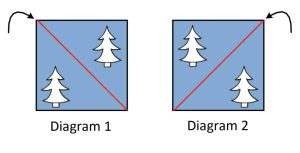
If using directional fabric, pay close attention to the cutting direction. With right-side-up (single layer) and in the correct orientation, cut three squares diagonally from bottom right to top left (diagram 1). Cut the remaining squares diagonally from bottom left to top right (diagram 2). This will provide the proper orientation of directional prints. For instance, birds will not be flying sideways or upside down. See diagram.
Background Fabric
- Cut two strips 4½” x width of fabric (WOF); sub-cut into twelve 4½” x 6½” rectangles (A)
- Cut one strip 2½” x WOF; sub-cut into twelve 2½” x 2½” rectangles (B)
Accent Fabric
- Cut three strips 2½” x WOF; sub-cut into 48 – 2½” x 2½” squares (C). Draw line from corner to corner.
- Cut two strips 2⅞” x WOF; sub-cut into 18 – 2⅞” x 2⅞” squares (D). Cut each of these 18 squares in half, diagonally, to make 36 half-triangles.
Focus Fabric
- Cut two strips 2½” x WOF; sub-cut into 24 – 2½” x 2½” squares (E)
- Cut one strip 4½” x WOF; sub-cut into three 4½” x 4½” squares (F)
Setting Triangle Fabric
- Cut one strip 6⅞” x WOF; ub-cut into six 6⅞” x 6⅞” squares (G). Cut each of these squares in half, diagonally, from corner to corner.
Binding
- Cut four strips 2½” x WOF
STAR BLOCK UNITS
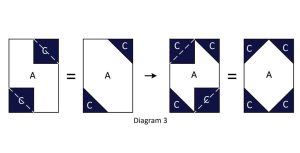
Unit A With right-sides-together, lay one C accent fabric on top of one A background fabric. Sew on the drawn line. Press toward the outer corner. Trim the excess fabric to ¼” seam allowance. Repeat on all four corners of the A background. Tidy and trim to 4½” x 6½” (diagram 3). Make 12.
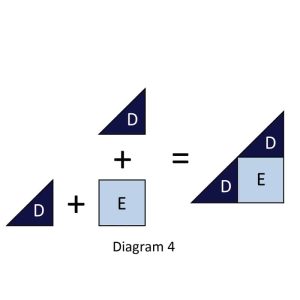
Unit B With right-sides-together, sew one D accent triangle to one E focus 2½” x 2½” square (caution if using directional fabric). Be sure to align the short edges of the triangle. Press.
With right-sides-together, sew another D accent triangle to this unit. Tidy and trim as needed (diagram 4). Make 12.
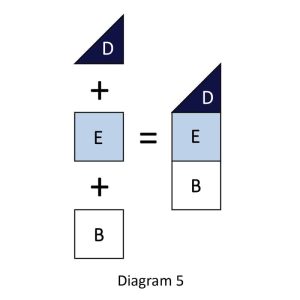
With right-sides-together, sew one B background 2½” x 2½” square to one E focus 2½” x 2½” square. Then sew one D accent triangle to the E focus square. Be sure to align the short edges of the triangle (diagram 5). Press. Complete 12 units like this.
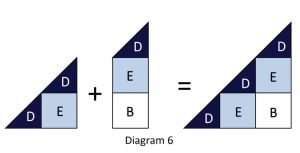
With right-sides-together, sew the above units together (diagram 6). Press.
Now add the setting triangles to unit B. Caution with the orientation if you have directional fabric. See note on page 41 for special cutting directions for directional fabric. With right sides together, sew the G setting triangle to the unit B along the diagonal (diagram 7).
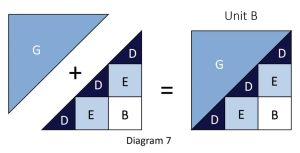
Caution with pressing this bias edge—fabric may stretch if pulled. Make 12, noting the orientation of directional fabrics. Tidy and trim to 6½” x 6½” as needed.
ASSEMBLY OF STAR BLOCKS
Lay one block out at a time, as shown in the master diagram. Pay attention to the orientation of the block and directional fabric if applicable.
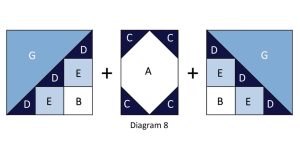
Row One With right sides together, sew one unit A between two unit Bs (diagram 8). Press.
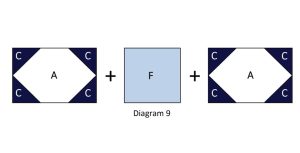
Row Two With right sides together, sew one focus 4½” x 4½” square between two unit As (diagram 9). Press.
Row Three With right-sides-together, sew one unit A between two unit B’s (diagram 10). Press.
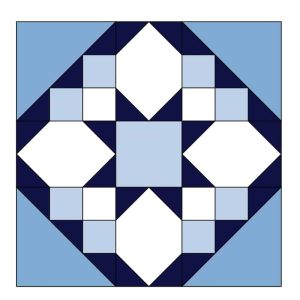
Tidy and trim as needed. Measures 16½” x 16½”. Make three blocks.

RUNNER ASSEMBLY With right-sides-together, and matching all seams, sew three blocks together to create your runner. Press well. Measures 16½” x 48½”.
ABOUT THE DESIGNER
Owner of The Quilter’s Bouquet, Arlene is a Canadian pattern designer, teacher and presenter at quilt guilds. She is passionate about designing and sharing ideas and innovations with fellow quilters. The opportunity to create and share what she loves, while meeting new friends, is the greatest reward Arlene can imagine.
