

This June, at Quilt Canada 2020, there will be a wonderful quilted postcard sale. All the quilted postcards, made by volunteers across the country and donated to the sale will be on display in a large booth and available to purchase. The funds raised will be given to the Glenrose Paediatric Brain Injury Unit in Edmonton, AB, to help children with brain injuries.
Quilters far and wide are invited to make postcards for this worthwhile cause and mail them to representatives, who will make sure postcards arrive at Quilt Canada 2020. CQA/ACC encourages young quilters will take up the challenge as well! Jump in and participate… have fun learning a new skill!
Supplies
- stiffener, such as Timtex® or Peltex® (use one that is quite stiff)
- fabric: cotton will work best for this project.
- fusible product
- embellishments, such as beads, fabric paint, ribbon,
- embroidery thread, etc.
Instructions
Cut a 4″ x 6″ piece of stiffener (Timtex/Peltex).
FRONT OF POSTCARD
OPTION A If you want a pieced background, like a mini quilt top, or you want to add some thread sketching with a sewing machine, cut and piece the postcard front slightly larger than 4″ x 6″ to allow room for shrinkage due to thread tension and seam allowances. Once you are finished making your postcard front, trim it to 4″ x 6″ and fuse it to one side of the stiffener.
OPTION B You may simply cut a 4″ x 6″ piece of fabric and fuse it to one side of the stiffener with a plan for embellishing later.
Creative Ideas

Get ready to create! There are so many options. Here are a few ideas:
- Using option B, find a special piece of fabric, for example, with a flower or animal in the fabric print. Fuse it to the stiffener and enhance it with thread and beads.
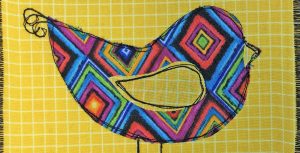
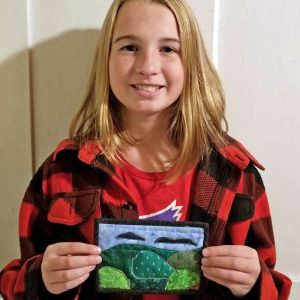
- Using option A, cut several pieces of fabric and apply fusing to the back of each piece. Layer fabric to create an image, such as a landscape, little creature or activity, like kayaking. Once the image is complete, trim it to 4″ x 6″ and fuse it to one side of the stiffener.
- Using option B, find a piece of solid-coloured fabric or one with a small, subtle print. Using fabric paint, create a picture of your favourite pet or pastime. Once the paint is dry, trim the fabric to 4″ x 6″ and fuse to one side of the stiffener.

- Make a postcard using either option A or B. Once the fabric is fused to the postcard front, try using sparkly or heavyweight threads to highlight the postcard. Or add ribbon to the border of the postcard. This is also a good time to glue beads with fabric glue.
BACK OF POSTCARD
After you have fused the front of your postcard to the stiffener and finished adding stitches or other sewn embellishments, apply fusible product to the back side of the 4″ x 6″ piece of fabric that you want to use as your background for your postcard. Fuse fabric onto your stiffener (Peltex/Timtex). If you want to write a message on the back fabric of your postcard, use a light-coloured fabric. Write the message after the fabric is fused to the stiffener.
FINISHING POSTCARD EDGES
Once finished the front and back of your postcard, add a blanket stitch or dense, machine zigzag stitch around all four edges. Decide on the colour of thread, length of stitch and how dense, or close together, you want the stitches to be. It is best to test your edge stitching on a scrap of fabric fused to a scrap of stiffener.
TIP 1
When using a zigzag stitch, aim the needle to barely rub against the outside edge of the postcard, in order to be certain that all the fabric and stiffener is contained within the stitching.
TIP 2
Instead of trying to run the zigzag stitch around the corner of the postcard, run the stitch right off the edge of the postcard, then lift the needle and foot and start at the beginning of the next edge. Repeat until all four sides are stitched. Trim threads.
