

This pattern is one of four quilts designed as a tribute to the seasons. Winter features a pieced border of alternating blocks, which surrounds a beautiful, fusible appliqué, wreath of poinsettias and holly. Red beads are hand stitched as berries and yellow-green glass beads are hand stitched as centres for the poinsettias. I love adding embellishments to quilts for the extra dimension and beauty.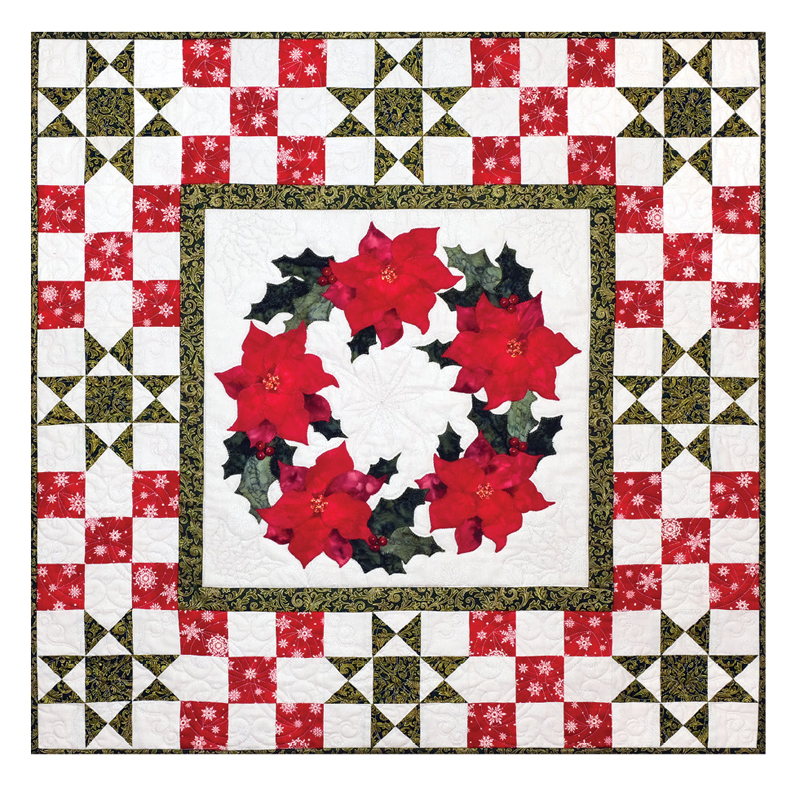
After finishing this quilt, if you would like to make the other three seasons of this series, please visit The Quilter’s Bouquet to order patterns. Finished size: 30″ x 30″
Fabric Requirements (based on an approximate 42″ fabric width)
- White background fabric: 1 metre (approximately 40″)
- Red: 0.25 metre (approximately 10″)
- Green: 0.70 metre (approximately 28″ including binding)
- Appliqué fabric for flowers: one fat quarter (batiks recommended)
- Appliqué. fabric for leaves: one fat quarter (batiks recommended)
- Backing: 1 metre (approximately 40″)
Supplies
- Fusible webbing: 1 metre (approximately 40″)
- Batting
- Embellishments as desired; this quilt is embellished with glass beads.
General Instructions
- When piecing, use a scant ¼” seam allowance with right sides together, unless otherwise stated. Be sure to test your ¼” seam allowance before you begin.
- This pattern uses fusible webbing.
- The centre design templates are provided in reverse.
- I highly recommend using a Teflon® pressing sheet when designing the appliqué.
Cutting
White background fabric:
Cut four strips 2 ½” x width of fabric (WOF)
Sub-cut one strip in half (approximately 22″)
Sub-cut two strips into 32 – 2 ½” x 2 ½” squares
Cut two strips 3 ½” x WOF
- Sub-cut into 16 – 3 ½” x 3 ½” squares
Cut one square 16 ½” x 16 ½” (background for appliqué)
Red:
Cut three strips 2 ½” x WOF
Sub-cut one strip in half (approximately 22″)
Green:
Cut two strips 3 ½” x WOF
Sub-cut into 16 – 3 ½” x 3 ½” squares
Cut one strip 2 ½” x WOF
Sub-cut into 8 – 2 ½” x 2 ½” squares (centre of star blocks)
Cut two strips 1 ½” x WOF (for inside borders)
Sub-cut into two strips 1 ½” x 16 ½”
Sub-cut into two strips 1 ½” x 18 ½”
Cut four strips 2 ½” x wof (for binding)
Star Points
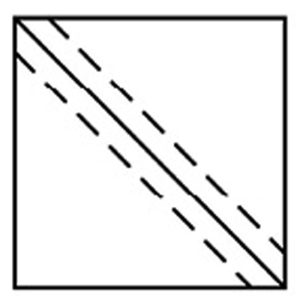
1. Draw a diagonal line from corner to corner on the wrong side of background 3 ½” x 3 ½” using a non-permanent fabric marking pen.
2. With right sides together, lay the background 3 ½” x 3 ½” on top of the green 3 ½” x 3 ½” squares.
3. Sew a scant ¼” on both sides of the drawn line.
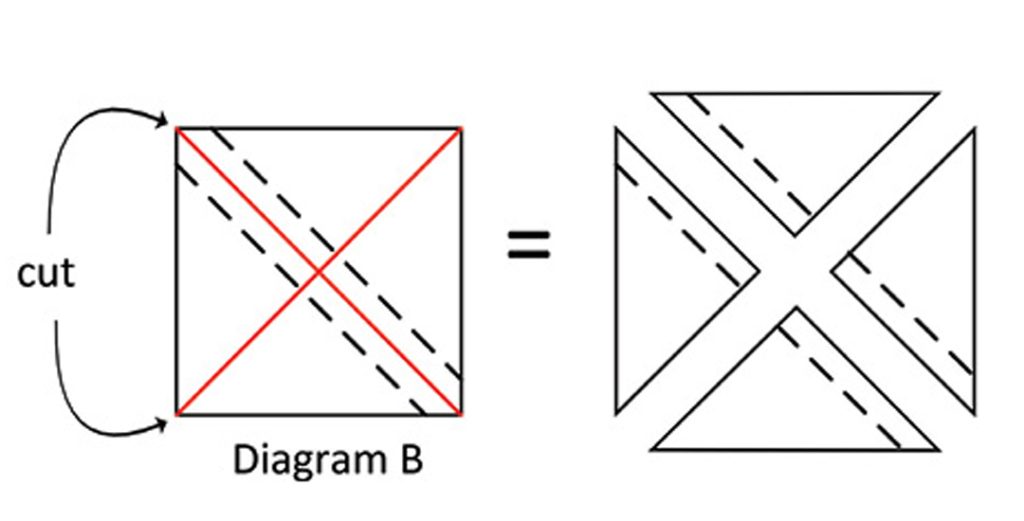
4. Cut on the diagonal line between the previously sewn lines and without moving your fabric cut across the opposite diagonal line (Diagram B).
5. Press toward the darker fabric.
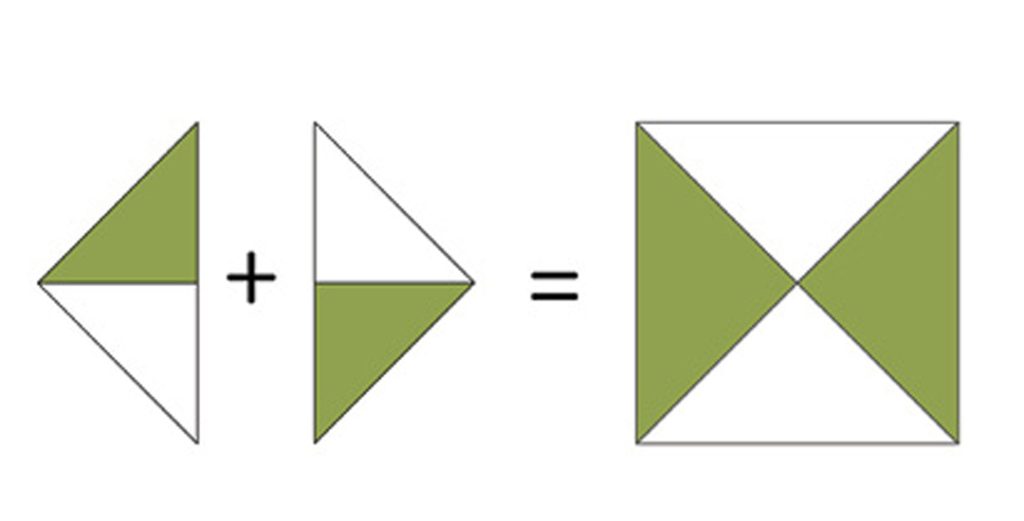
6. With right sides together, match the pieces with opposite fabrics next to each other.
7. Sew a scant ¼” down the length of the unit.
8. Press the seams open for reduced bulk.
9. Tidy and trim symmetrically to 2 ½” x 2 ½”.
10. Repeat to make 32 star points (four for each block).
Star Block
Once all the star points are made (four for each star block, 32 star points in total), begin to assemble the star block.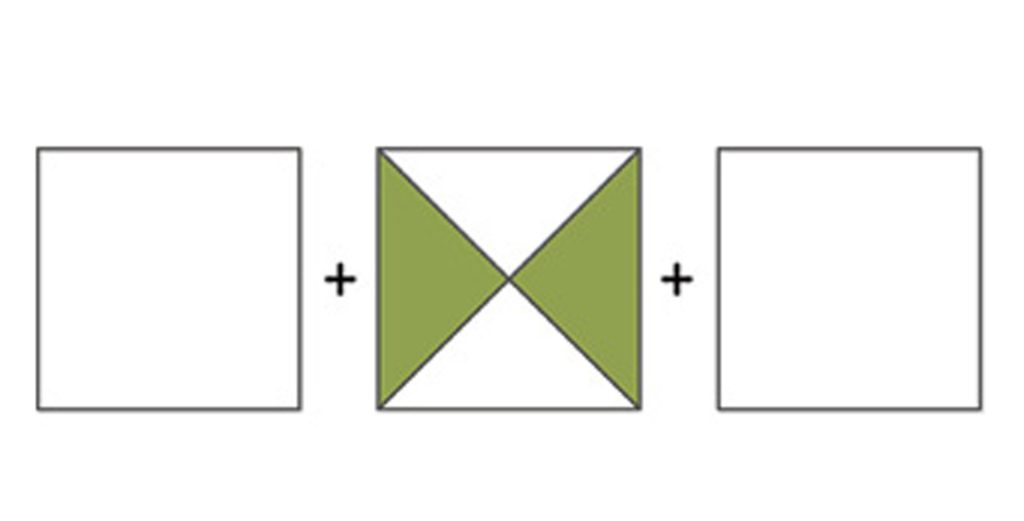 Row 1: With right sides together, sew one 2 ½” x 2 ½” background fabric to each side of a star point. Match raw edges and sew a scant ¼” seam allowance.
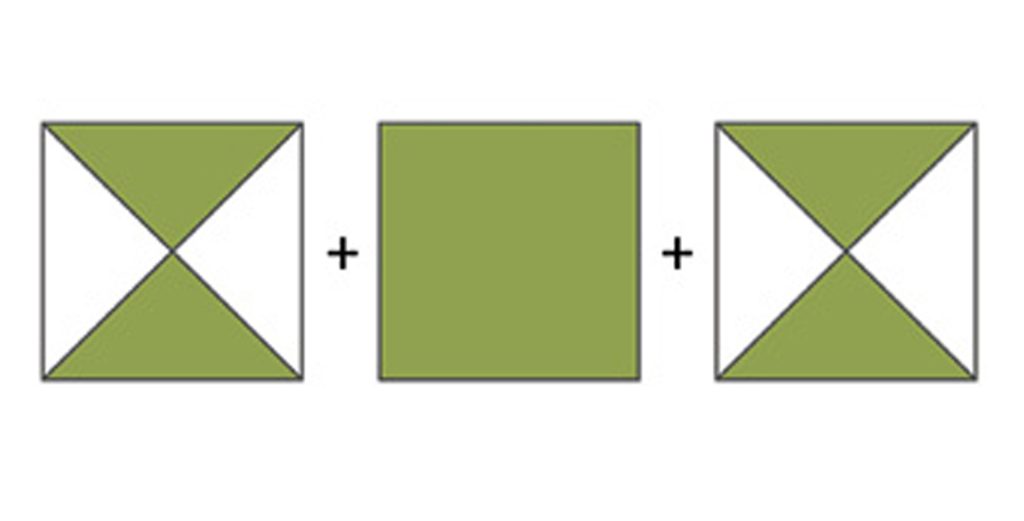 Row 2: With right sides together, sew one 2 ½” x 2 ½” star point to each side of a 2 ½” x 2 ½” green square.
 Row 3: Same as first row.
With right sides together, sew the rows together. Make eight star blocks exactly like this. Press seams to the least amount of bulk.

Be sure blocks are 6 ½” x 6 ½” when completed. Tidy and trim as needed.
Nine-patch Block
Unit A: With right sides together and matching raw edges, sew one 2 ½” x width of white background fabric between two 2 ½” x width of red fabric strips. Sub-cut to 16 – 2 ½” x 6 ½” strips.

Unit B: With right sides together and matching raw edges, sew one 2 ½” x 22″ red strip between two 2 ½” x 22″ white background strips (diagram J). Sub-cut to 8 – 2 ½” x 6 ½” strips.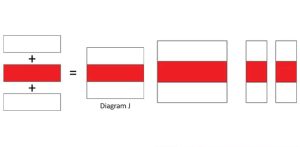
Unit C: With right sides together and matching seams, sew one unit B between two Unit A’s . Make eight nine-patch units exactly like this. Press seams to nest nicely with the star block. Be sure each unit C measures 6 ½” x 6 ½”. Tidy and trim as needed.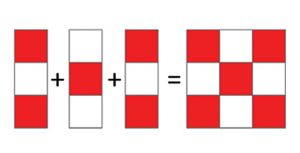
Background
With right sides together, sew one 1 ½” x 16 ½” inner border strip to each side of the 16 ½” x 16 ½” background. Press seams to the border.
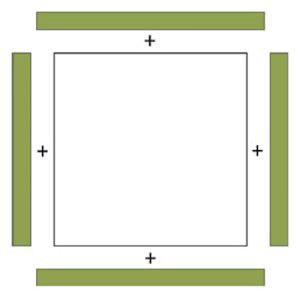
With right sides together, sew one 1 ½” x 18 ½” inner border strip to the top and bottom of the background. Press seams to the border.
Outer Borders
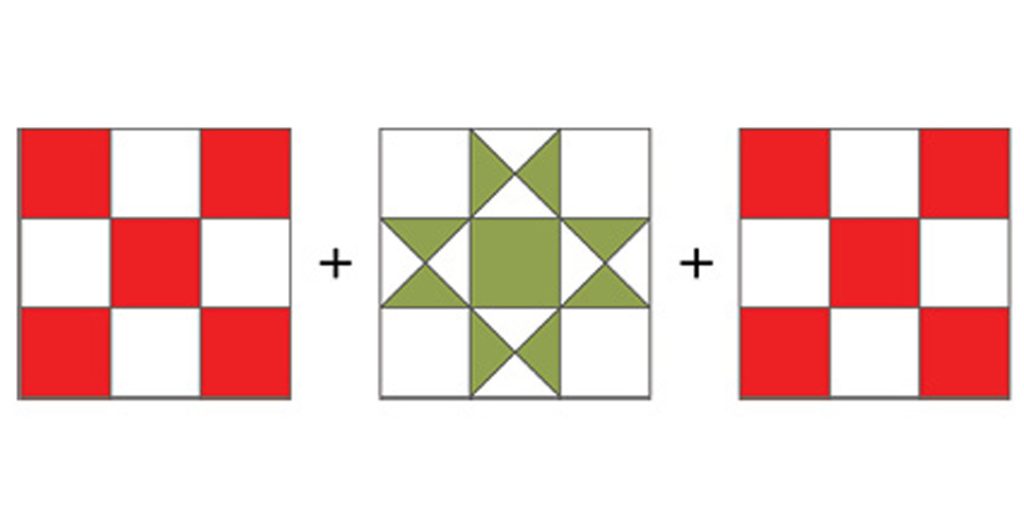 With right sides together and matching seams, sew one star block between two nine-patch blocks. Make two, side, outer-border units. With right sides together, sew these outer border units to each side of the inner border of the quilt. Be sure to match your top and bottom edges.
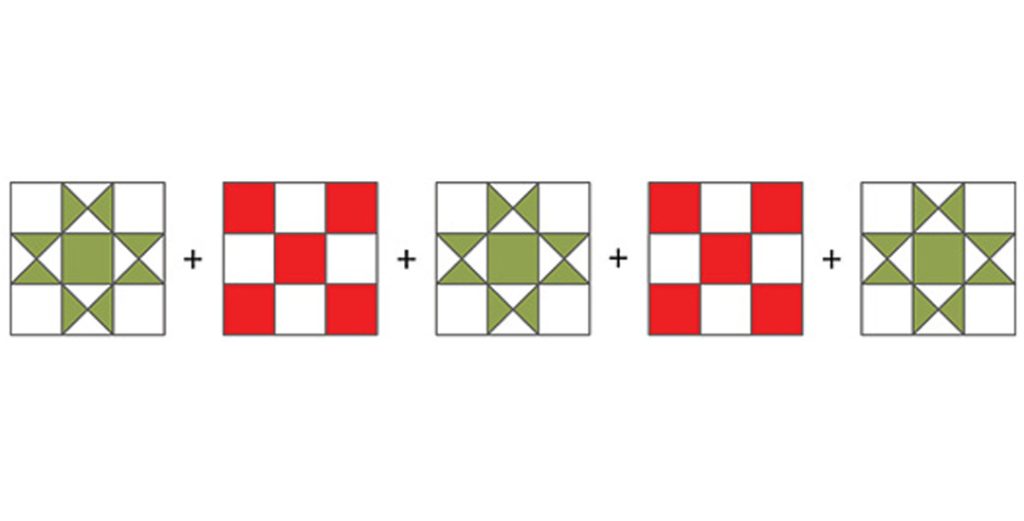 With right sides together, and matching seams, sew top and bottom outer-border units together as shown. With right sides together, sew these outer-border units to the top and bottom of the inner border of the quilt, being sure to match top and bottom edges. Refer to master for guidance. Press all seams to the inner border.
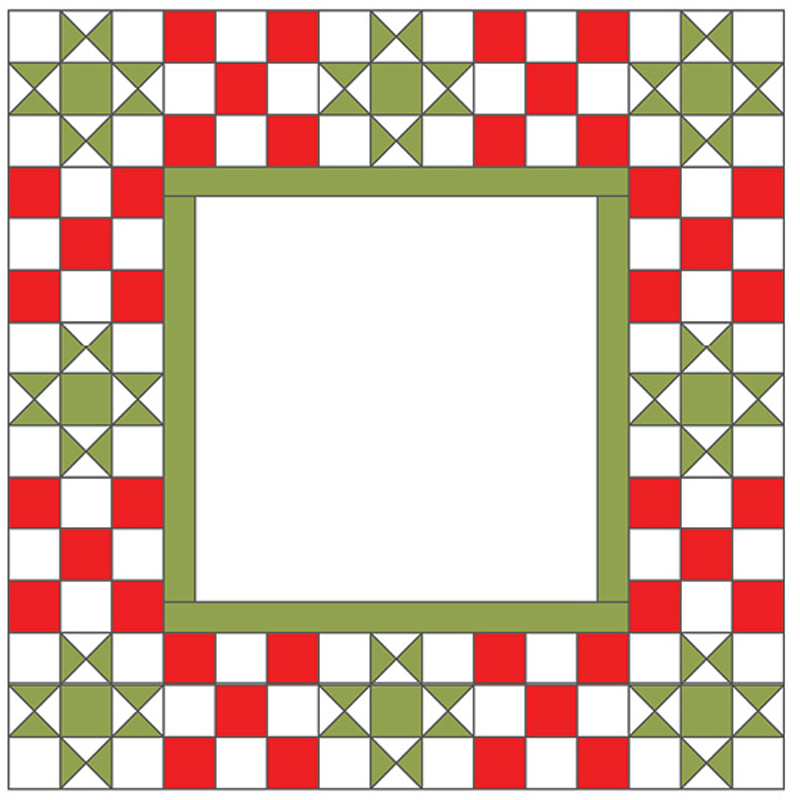
Appliqué
Following manufacturer’s instructions, trace all appliqué pieces* on fusible web. Press onto the wrong side of your fabric. Be sure to interview your fabric to maximize the colour variations to create depth and realistic petals and leaves. *A reverse template is provided for the poinsettia petals and holly leaves.
Download the Poinsettia Templates & Placing Guild.
Carefully cut out petals and leaves on the draw lines. Note the dashed lines provide a small, additional bit of fabric to tuck under another petal.
Tips: I prefer to assemble each flower individually and then set it aside until ready to assemble the entire wreath. Use the placement guide provided to assemble the flowers. Note the placement guide for the individual flowers is drawn right side up. I like to use a Teflon pressing sheet to assemble with my pattern guide underneath the pressing sheet for placement. The five flowers are identical.
When all flowers are assembled and pressed as individual units, begin to arrange the wreath. Centre the wreath on the background of the quilt by arranging flowers and leaves as desired, using the colour photo above for guidance. Once happy with the arrangement, carefully press with an iron to set the appliqué in place.
Finishing
Appliqué, quilt, bind and embellish as desired. I generally use a small blanket stitch to finish the edges of the appliqué. Zigzag or satin stitch also work.
