

Are you thinking of entering your quilt in a competition or juried show? First of all, good for you! Second, you need to know how to take a good photograph of your quilt, so it’s easier for curators to see how amazing it is. The quilts that are chosen to hang in the National Juried Show, for example, are picked based on their photographs alone – the jurors don’t get to see the actual quilts at that early stage. There are many reasons why a quilt may be rejected; don’t let poor photography be one of them.
CAMERAS
These days, not everyone has a camera; most of us use our smartphones to take pictures. Either way, the tips provided here will come in handy. If your quilt isn’t huge, you will be able to take decent photos using your smartphone. Newer phones create large files, have good auto-focus and take decent indoor photos without a flash. Phones have also improved for focusing at close range, which makes them great for detail shots. For the images shot by phone, I used an iPhone® 8. I turned on the grid option, to help frame the quilts.
There are so many good compact cameras out there, it’s difficult to say if yours will be useful for shooting quilts, but again, if the camera is relatively new, it’s probably fine. If it’s a DSLR, it’s primo. For the images shot by camera, I used a Nikon® D3300 digital camera without the flash. It had a zoom lens, but I didn’t use the zoom (for the detail shots, just get close to the quilt).
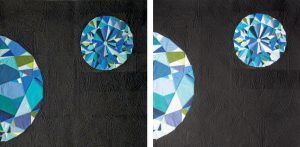
Photo on the left taken with an iPhone 8; on the right, with a Nikon D3300 (digital SLR).
The first thing you should do is clean your lens, even if you’re using a phone. I use the lens cleaner that comes with my eye glasses. Nothing worse than taking a bunch of photos and then realizing there’s a cat hair, or some such, in every shot. For this reason, among others, don’t dismantle your quilt set-up until you’ve checked over all the photos on your computer screen. (I took several how-to photos of Tara’s quilt (shown at right), then packed it up nicely back into its mailing package, only to realize I hadn’t taken the how-not-to shots yet.)
I suggest beginners use the camera’s auto features for focus and exposure. The only setting you should change is to disable the flash. This goes for both whole-quilt and detail shots: nothing flashy! If you’re using a compact digital camera, make sure you’re recording the largest images possible. Your camera may have a setting for file size; choose the setting that creates the largest files. Experienced photographers may be more experimental and use camera features such as filters to adjust for things like artificial light, when natural light is not available.
SETTING UP YOUR “STUDIO”
There are a couple of good places to use for quilt photography: one is outdoors on an overcast day; the other is a room in your home that is well lit by natural light. The day I shot the photos shown here, it was overcast and I used a south-facing window with the curtains wide open. Contrary to what you might be thinking, you don’t want bright light on your quilt. The best light is even light, preferably not artificial light. Ambient daylight is best. That’s because it won’t affect the colours of our quilt. If you’re shooting indoors, use only the light coming through the window, preferably a large window or sliding doors, so that your whole quilt is evenly lit; you don’t want any shadows.
If the quilt is laying on the floor, place it near the window, with nothing between it and the window (including you; shoot it from one of the other sides). Turn off all indoor lights, otherwise they will cast your quilt in yellow or (egad!) green light. If your quilt is hanging indoors, make sure it is facing and parallel to the window. Take a few test shots, then look at them on your computer screen to make sure there are no dark spots (usually edges or corners) on the quilt. If there are, adjust the position of the quilt until the whole thing is evenly lit.
If you’re outdoors, again, do this on an overcast day or under an awning. Bright sunlight will have a similar effect to a flash – too bright, too concentrated – it will affect the colours of your quilt, and cast shadows or uneven light.
GET YOUR QUILT READY
There are a few things you can do to prepare your quilt for its photo shoot. Cleaning it with a lint-roller is a good start. If it’s been folded up for storage, you will
need to iron it so there are no creases and it lays perfectly flat. If you’re laying it on the floor, put a white sheet under it. This step provides a neutral background and makes it easy to move the quilt around without having to touch it.
TIP Don’t use a dark background behind your quilt. Although you may want to display your quilt on a black background for other purposes, use a neutral background for competition photography. The colours of surrounding objects may affect the colours of your quilt when photographed, particularly around the edges.
Once you take a photo, check on-screen to make sure that no part of the quilt is very bright or very dark – you want the light as even as possible. This may mean turning your quilt until you find the best lighting conditions.
If your quilt is large, you will be very glad if you added a hanging sleeve on the back. All quilts entered in the NJS, for example, must have hanging sleeves on them. This makes it much easier to hang and display the quilts without causing damage. Find yourself a long piece of doweling, or an expandable shower rod to use as your hanger, then find two friends to hold the ends of the rod or rest them evenly on something solid, like two ladders.
I’ve seen a lot of quilts hanging outdoors from deck railings and clothes lines, too. This works well if it’s not windy outside and if the sun is not shining too brightly.

Every little thing shows
Quilters’ own photos are used to create the catalogue for the NJS and in Canadian Quilter. It’s important that the quilts be flat (not wind-blown); that no fingers,
clips or clothes pins be visible (straight pins or clear push pins are easier to hide); and that no edges are cut off.
FRAMING THE SHOT
For quilt competitions, you need an overall shot of your quilt and a detail shot. For the overall shot, you want the image as square as possible (no distortion) and all edges showing – don’t cut anything off when you crop the photo. You may be worried that you don’t want anything in the background to show, especially if you’re shooting outdoors, so you may try to make the quilt so large in the viewfinder that some of the edges of the quilt are slightly cut off …don’t do that. The jurors need to be able to see the entire quilt, edges and all.
We’ve mentioned distortion a couple of times. This is caused by the lens in your phone camera. Ever noticed when you take photos of several people together, that the people on the far right and left look like they gained about 30 pounds? That’s because of lens distortion and it will happen to the edges of your quilt, too, unless you place the camera in the centre of the quilt and let a little background show around the quilt.
Also, a camera phone will make your quilt look like it’s on a bit of an angle unless you’re careful to position it. You want the camera to be as close to the centre of the quilt as you can get it. Use the grid lines (or the edges of the view finder) to judge when the edges of the quilt (assuming they’re straight) are perfectly parallel.
If you’ve got your quilt hanging for the photo, use the same principle: place the camera so that it’s pointing at the centre of the quilt. Secure it on a tripod, some
boxes or a step ladder – whatever you can find that’s the right height. Avoid being a contortionist – bending your knees or standing on your toes – to hand-hold the
camera in the best position. That will likely result in a blurry photo and a sore back.
NOW, FOCUS
Thankfully, smartphones and digital cameras have auto-focus features. This is important, because you may not be able to look through the viewfinder once the
camera is centred over the quilt. You’re likely looking at it from a distance (the length of your arm) and at an angle, which makes it impossible to use manual focus.
They say to hold your breath when taking photos. That’s to reduce any potential for movement when you press the shutter release. This also applies to smartphones, because the simple movement of touching the shutter button can make the phone move slightly. This will result in a blurry photo. You may not be able to see that blur on the phone’s or camera’s preview, but take a look at it on your computer screen, enlarged. What may look great on Instagram®, doesn’t necessarily look great enlarged or in print.
Keeping things steady with a phone is a lot easier and there are options, like using a selfie stick with a remote button. If you’re using a digital camera, use a tripod and/or a remote or place the camera on a hard surface, so that when you touch it, it doesn’t move.
THE DETAILS
Taking detail pictures is going to feel like a breeze once you’ve finished the overall shots. Keep some of the same principles in mind though: keep the quilt area evenly lit and don’t cast any shadows; use something to steady the camera, so your shots won’t be blurry. I kept the quilt on the floor and knelt down to take the detail shots from less than a foot away, but leaned both elbows on a step ladder while I hand-held the camera. This allowed me to keep the camera exactly parallel to the quilt surface to avoid any distortion and stabilized the camera while I pressed the shutter button.
CHECK, DOUBLE-CHECK, TRIPLE-CHECK
As you shoot, take lots of photos and transfer them to your computer as you go. Enlarge them on-screen to check for good focus, even lighting, distortion and blur.
(And cat hairs.) Keep taking photos until you get everything right. If you can’t see details in the quilting (such as thread colours) when you enlarge a whole-quilt image, that may mean you need to switch to a camera instead of a phone (that may be the case for very large quilts). If detail shots are out of focus, it may be that your phone camera can’t focus at close range; shoot from further away, or use a newer phone.
SAVE THE BEST, FORGET THE REST
Once you have an overall shot and a detail shot that you’re happy with, give yourself a pat on the back. Make sure the images are right-side up by rotating them if necessary. Then save your two files as full-size jpegs with appropriate names that make it easier to find them later and for curators to identify who made the quilts. For example, you could name the files yourname_quiltname_overall.jpg and yourname_quiltname_detail.jpg. Don’t touch up the images in any way or crop them. For example, if you find the images too dark or the wrong colours, it’s better to take new photos than to make those adjustments in photo-editing software.
THE QUILT
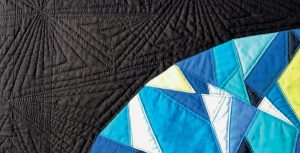
The lovely quilt used to illustrate this article, The First Cut is the Deepest, was made by Tara Wells, one of the designers of Canadian Quilter. Its design is based on a photograph of a diamond in her father’s ring. The challenge with photographing this quilt, as Tara discovered when she entered it into the NJS 2018, is that it’s
largely black. Photographing it requires suitable lighting conditions to show off the free-motion quilting.
Although this quilt is roughly 48 inches tall, most of Tara’s creations are much larger, usually queen-size. “The smaller the quilt,” she says, “the easier the process, so I guess the difficulty scales according to size, and the space(s) you have to shoot in.” Tara has tried a few different methods for photographing her larger quilts. One is to “roll everything out of my studio, sweep and lay the quilt flat on the floor next to the big picture window during the brightest cloudy day that comes my way.” This requires placing a ladder alongside the quilt, so it won’t cast a shadow.
“I have to do several takes, since the photos are being taken blindly, for the best reach to the centre. … Obviously, safety is an issue, as the larger the quilt, the higher the camera and the longer the reach…so, a strong ladder and/or hand holder may be required with this method.”
That sounds like something we don’t want to recommend for non-acrobats, so here is Tara’s second method: “On a warm, dry, non-windy day, but also bright, cloudy day, I have laid quilts out on the deck and climbed up onto the railing like a monkey and shot from as high and as close to the centre, while holding onto my clothesline pole for dear life!” Oh my! What’s option three?
“I have also shot them neatly and regularly pinned to my clothesline on a windless (and bright n’ cloudy) day as possible.” That sounds much safer!
Tara’s mother was a prolific quilter. “She would always sew a hanging sleeve to the back of her quilts (without fail) and my father had an adjustable wall hanging track and hardware installed at the top of nearly every wall of their house.” So, Tara’s mother could hang quilts “almost anywhere and just step back to shoot them…much easier to get a good, straight shot without needing Photoshop® intervention.” Her hanger of choice was a long piece of baseboard inside the hanging sleeve.
The bottom line: “I think having a hanging sleeve, a strong rod and two good buddies holding up either end as high as possible (but level) in the best, most even natural lighting situation possible, while you (the photographer) are far back enough to capture the whole work… that would be the best scenario.” Or, adds Tara, “throw a quilt-photographing party.” Sounds like a plan!
GOOD LUCK!
Now that you have some photos to add to your submission, congratulations on entering a quilt competition. This is a wonderful accomplishment and it deserves a celebration! The outcome is out of your hands – they have already done their work.
You can find details about photo requirements for entries to the National Juried Show on the NJS page of our website.
