

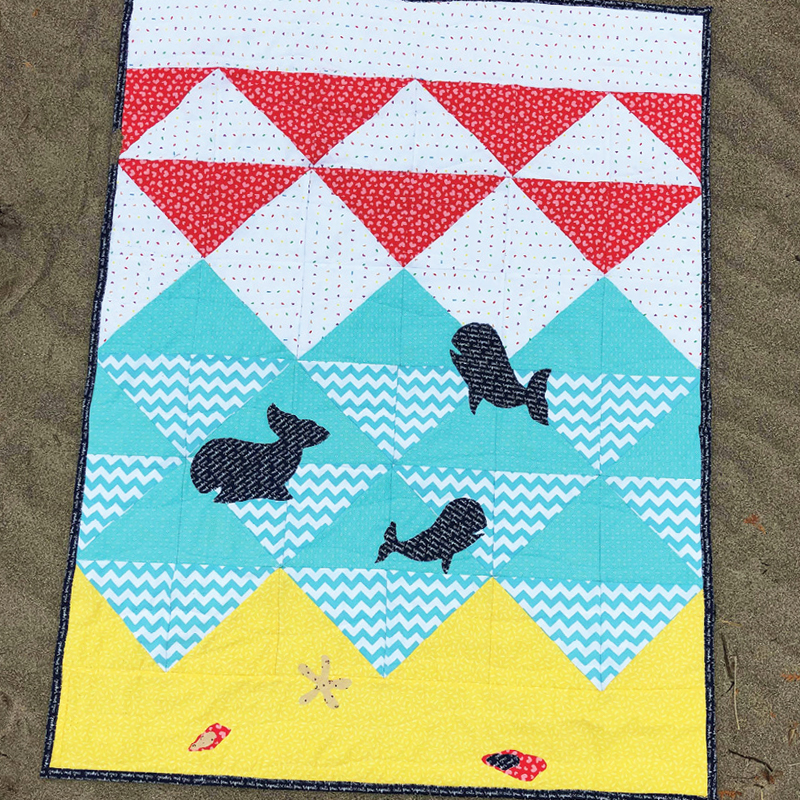
Cozy up in your quilt at the beach while you watch the whales frolic in the waves!
Supplies:
- ¾ yard (0.7 metre) white
- ½ yard (0.5 metre) pink
- ¾ yard (0.7 metre) aqua
- ¾ yard (0.7 metre) aqua chevron (or other aqua pattern fabric)
- ¾ yard (0.7 metre) yellow
- ½ yard (0.5 metre) navy for binding
- 1½ yards (1.4 metres) navy for backing
- 1½ yards (1.4 metres) batting
- ⅓ yard (0.3 metre) fabric for hanging sleeve
- ½ yard (0.5 metre) fusible product
- masking tape
- neutral thread
- straight pins
- safety pins
Instructions:
There are 36 half-square triangles (HST) made in this quilt before assembly. The unfinished HST blocks will be 6½” square.
A. Cut one 6½” x 36½” strip from both the white and yellow fabric. Set aside.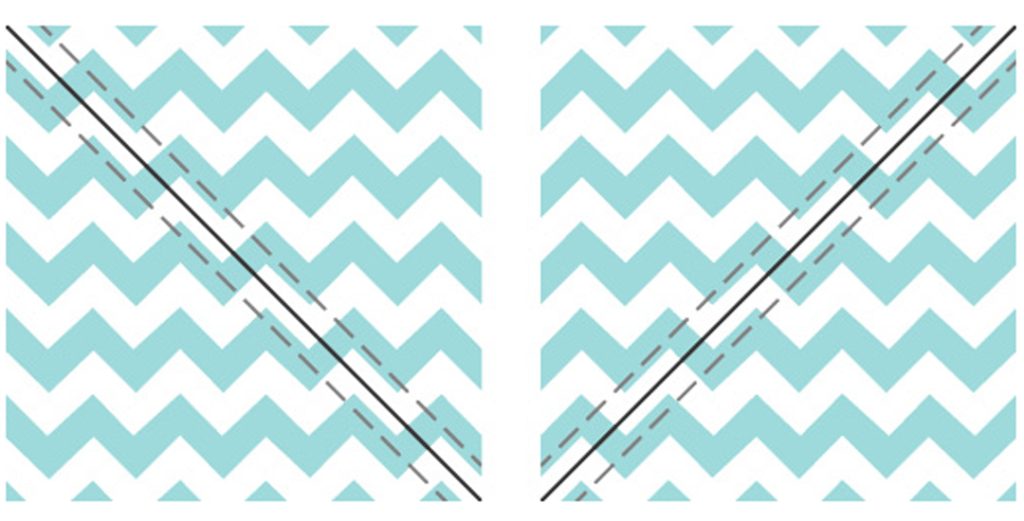
B. Make Half Square Triangles (HSTs)
Tips for using Chevron Fabric:
When working with chevron or other directional fabric, place fabric squares right sides together (RST) with the chevron fabric on top of the other square of fabric. Ensure chevron fabric is always horizontal. For each set of half-square triangles, draw the line on one chevron set from top left to bottom right and from top right to bottom left on the other set.
- Cut 9: 7″ white squares
- Cut 6: 7″ pink squares
- Cut 9: 7″ blue squares
- Cut 10: 7″ chevron squares
- Cut 4: 7″ yellow squares

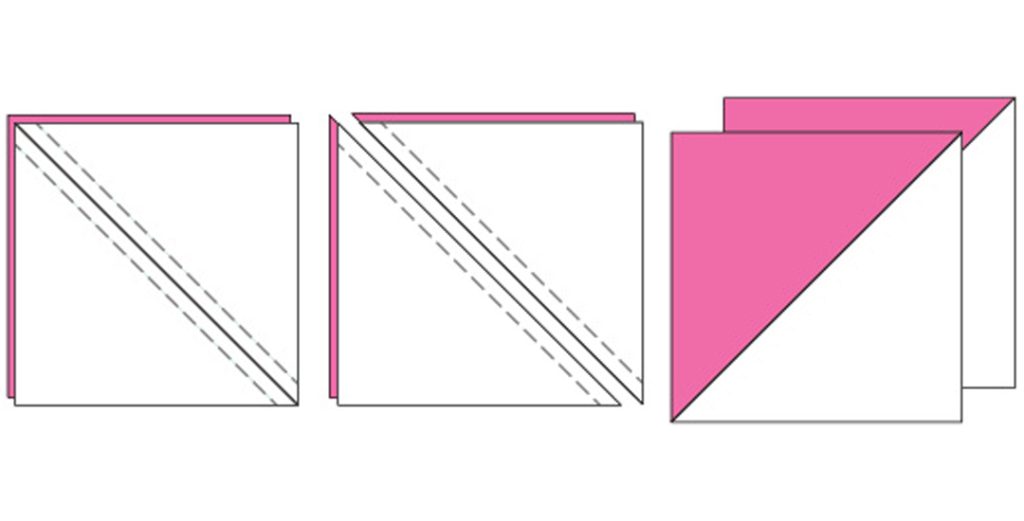
Lay one white and one pink 7″ square right sides together (RST). Draw a line on the diagonal from one corner of the square to the other. Sew ¼” on either side of the diagonal line.
Cut apart on drawn line. Repeat this step with five remaining white and pink 7″ squares to create a total of 12 pink and white HST blocks. Open HST blocks and press to the dark side. Trim squares to 6½”.
Lay one white and one aqua 7″ square right sides together (RST). Draw a line on the diagonal from one corner of the square to the other. Sew ¼” on either side of diagonal line. Cut on drawn line. Repeat this step with two remaining white and aqua 7″ squares to create a total of six aqua and white HST blocks. Open HST blocks and press to dark side. Trim squares to 6½”.
Lay one aqua and one chevron 7″ square right sides together (RST) (lay chevron fabric horizontally). Following the Tips for using Chevron Fabric, draw a line on the diagonal from one corner of the square to the other. Sew ¼” on either side of diagonal line. Cut on drawn line. Repeat this step with five remaining white and aqua 7″ squares (remember to draw alternating diagonal lines) to create a total of 12 aqua and chevron HST blocks. Open HST blocks and press to dark side. Trim squares to 6½”.
Lay one yellow and one chevron 7″ square right sides together (RST) (lay chevron fabric horizontally). Following the Tips for using Chevron Fabric, draw a line on the diagonal from one corner of the square to the other. Sew ¼” on either side of diagonal line. Cut on drawn line. Repeat this step with two remaining yellow and chevron 7″ squares (remember to draw alternating diagonal lines) to create a total of eight yellow and chevron HST blocks. Open HST blocks and press to dark side. Trim squares to 6½”. You are only using six of the yellow and chevron HSTs.
Pin Tip: When sewing rows together, put a pin at each seam of the blocks to ensure seams match up.
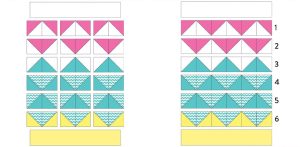
Lay out blocks starting with the 6½” x 36½” white strip (set aside earlier) at the top and finishing with the 6½” x 36½” yellow strip (also set aside earlier) on the bottom. Use the image on the left as a guide.
Using a quarter-inch seam allowance, sew blocks together, first in pairs. Remember to put fabric RST when sewing. Continue sewing pairs together until you have a row sewn together. Press block seams for row in one direction. Start sewing the block pairs together for the next row. Press block seams for the second row in the opposite direction.
Once each row is assembled, starting with the top rectangle of white fabric, sew rows together using a quarter inch seam allowance. Remember to put fabric RST. See Figure B.
When adding row two to row one, carefully match and butt seams together (use the Pin Tip). Stitch using a quarter-inch seam allowance along row edge. Open. Press seam down.
Continue until all rows are sewn together. Press well.
C. Add Sea Creatures
With your scraps, apply fusing to some of the scraps following the manufacturer instructions. Cut out the whale, seashell and sea star templates, on page 60, and trace them onto the fused fabric. Cut sea creatures out around traced lines. Fuse creatures to quilt top. Sew a small zigzag or machine appliqué stitch around the outside edge of the creatures. Thread can be matching or contrasting depending on the look you want. Download Playing at Providence Bay Templates.
If desired, embellish with buttons or other three dimensional items after the quilting is completed.
D. Assemble Quilt
Lay backing on a flat surface and use masking tape to tape the edges down. Pull fabric taut as you tape. Lay batting on top of backing. Smooth batting with your hand to get any ripples out.
Lay the quilt top, right side up, on top of the batting. Make sure batting and backing are visible (by at least one inch) all around the quilt top. Using the straight pins, start at one edge of quilt and pin along edge through all three layers. Move to opposite side of top and starting in the middle of that side, gently pull the fabric taut, put straight pins through all three layers. Go to adjacent side, pin, then move to final side and gently pulling fabric taut, pin.
Switching to safety pins, start at the centre of the quilt and pin through all three layers. Place safety pins every four inches in both directions. Safety pin through all three layers along edges. Once safety pins are in place, carefully remove all straight pins. Remove masking tape and lift layered quilt from flat surface.
Your quilt is ready for machine quilting.
E. Machine Quilting
When quilting a quilt by machine, it is best to start in the centre and quilt out. Due to the bulk of a quilt, place tables around your machine so the quilt can rest on the table and the hanging weight of the quilt is not always pulling at the sewing needle (and your hands). Also, roll as much of the quilt into a tube as you can, which allows more room to work.
Glove Tip: Use some type of rubber gloves to hold the quilt. It will make holding the quilt and sewing much easier.
If quilting straight lines, using a walking foot will assist greatly. If free-motion quilting, practice makes perfect! Start with a simple, large meander and steadily move the quilt so the thread is not getting pulled, snapped or creating tension problems.
Once the quilt is quilted, remove safety pins. Using a ruler and rotary cutter, trim excessive batting and backing to be square with the edges of the quilt top.
F. Make Binding
From the navy fabric cut 2½” strips across the width of fabric. Sew strips together along the 2½” ends until you get a long strip around 190″.
Fold strip in half, lengthwise, wrong sides together and press along long edge. Pressed binding strip should measure approximately 1¼” x 190″.
G. Attach Binding
With quilt top facing up, leave 5″ of binding from edge (a tail, so to speak), match the raw edge of binding to raw edge of quilt top edge and sew along edge using a quarter-inch seam allowance.
Corners: Stop sewing a ¼” from the corner. Lift needle out of quilt. Turn quilt 90°. Take binding strip and lay straight up, creating a fold right at the corner. Next, fold binding down on itself, laying raw edge along new side you will be stitching. Starting right at the top edge of the corner, begin stitching down the new side. Continue sewing using the same method on next three corners.
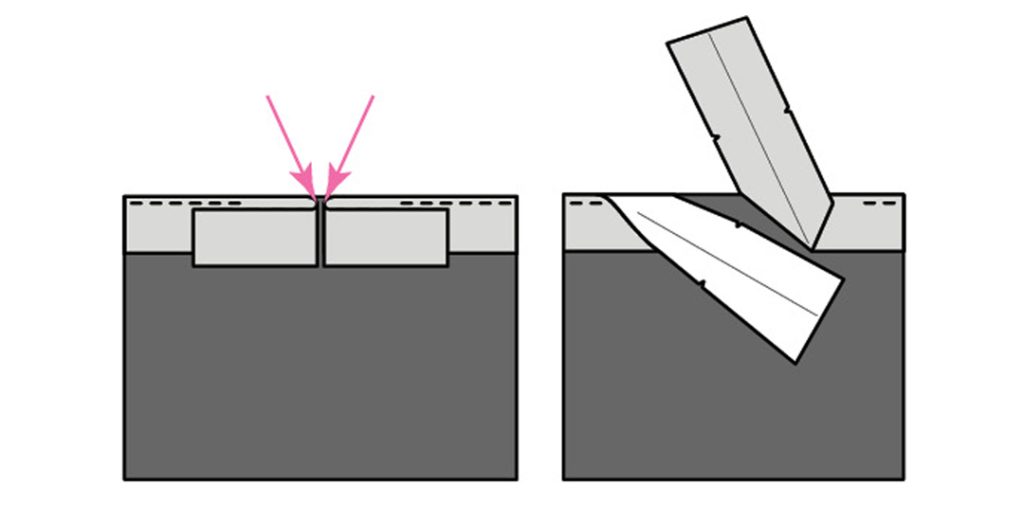
Stop stitching approximately 8″ from start of binding. Bring the tail ends together so they barely meet and fold each tail straight back on itself. Make a tiny, ⅛” snip on the folds (pink arrows in show where to snip).
Unfold the binding on both tails. Place right sides of fabric together, matching snips.
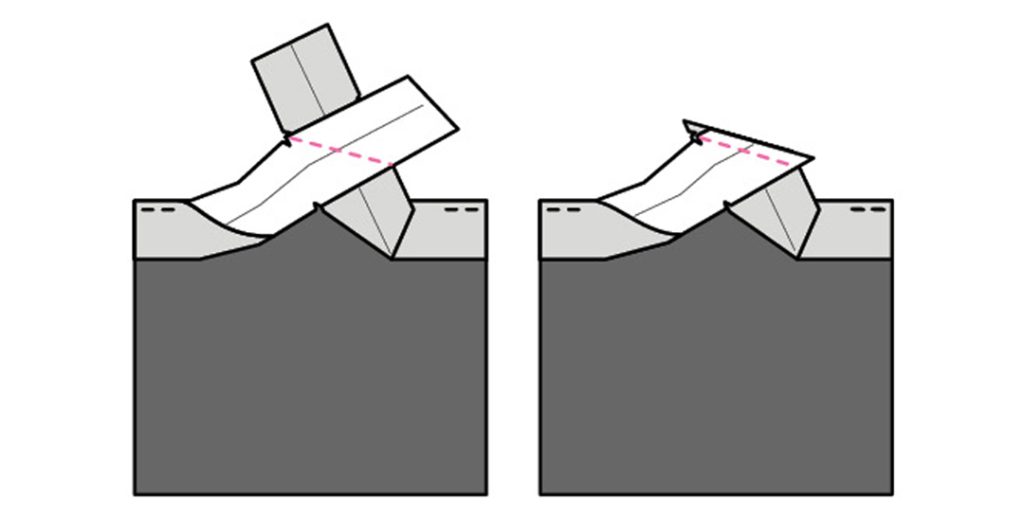
Sew a diagonal line across strips. Before trimming, make sure binding will fold back in half and that seam allowance is hidden inside fold. Also make sure there is no twist in the binding. Once seam is confirmed correct, trim seam allowance to a quarter inch. Fold binding so seam allowance is inside binding. Finish stitching binding to quilt.
Once binding is attached, fold over to back of quilt. Use clips or pins to hold binding in place. Hand stitch the binding onto the back of the quilt using tiny, invisible stitches.
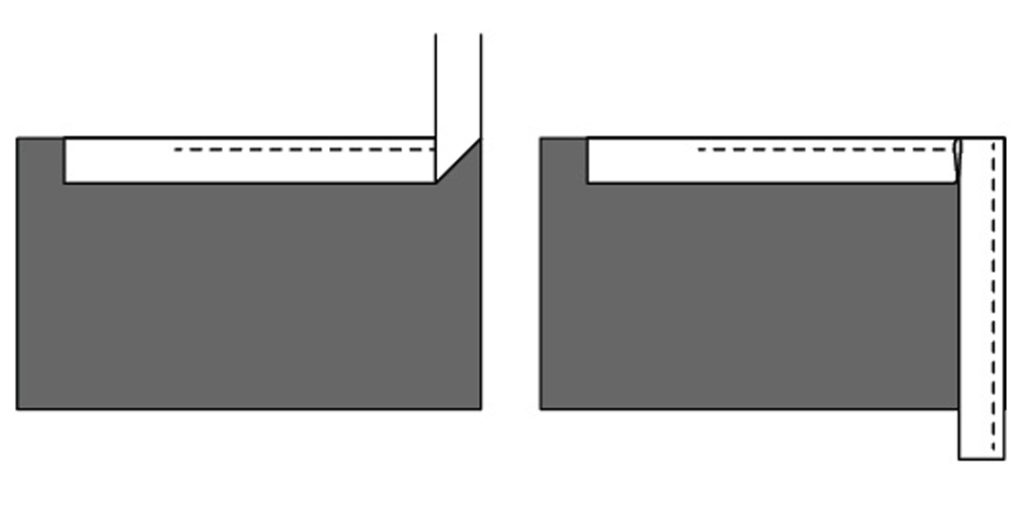
H. Hanging Sleeve
Cut a strip 6″ wide by width of fabric. Fold narrow ends in ¼” to the wrong side of the fabric and press, fold under another ¼” and press. Stitch down both ends.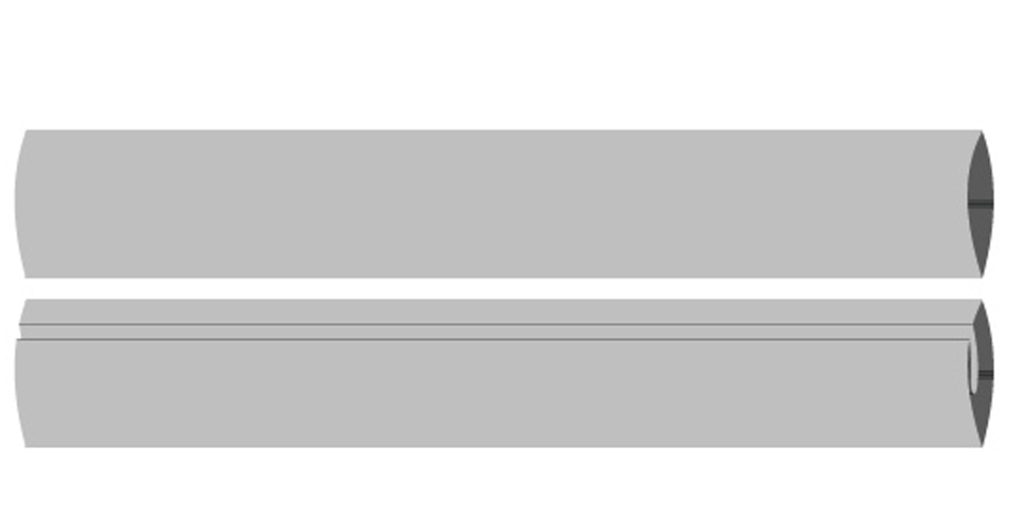 Along long edge, fold fabric in half right sides together. Stitch ¼” along edge of fabric to make a tube. Flip tube so right side of fabric faces out. Press tube so seam is located in middle of tube. Place seam face down on the ironing board. Lift fabric up and fold one inch on top of itself along the length creating a bubble in the fabric. Press. The bubble will allow room for the rod to go through.
Pin tube to back of quilt, sew the top and bottom of the sleeve to the back of the quilt with hand stitching. Be careful not to sew through all layers of the quilt.
Fabric generously supplied by Riley Blake and JN Harper.
